Mastering the Art of Adjusting a Tempering Valve: A Step-by-Step Guide
Introduction
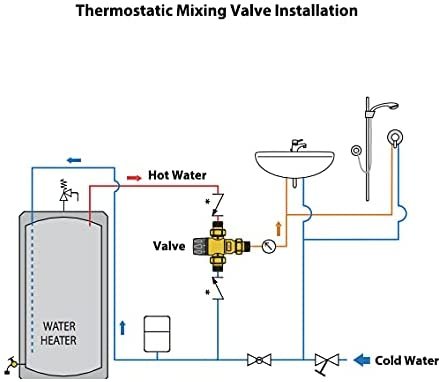
Tempering valves, or thermostatic mixing valves, play an indispensable role in both residential and commercial plumbing systems, ensuring that hot water is delivered at safe, consistent temperatures. This comprehensive guide provides detailed insights into how to adjust a tempering valve, covering the necessary tools, steps, and safety precautions to optimize performance and safety.
Understanding Tempering Valves
A tempering valve blends hot and cold water to a preset safe temperature before it reaches the tap. This mechanism prevents scalding injuries that can occur from hot water and is crucial in environments with vulnerable populations like children and the elderly.
Tools and Materials Needed
Before adjusting a tempering valve, ensure you have the following tools and materials:
- Adjustable wrench or spanner
- Screwdrivers
- Calibrated thermometer
- Replacement parts (if necessary)
- Manufacturer’s manual
Safety First
Safety is paramount when working with plumbing, especially hot water systems. Always turn off the water supply before beginning adjustments to prevent any accidental spillage or burns. Ensure the work area is dry and wear appropriate safety gear such as gloves and goggles.
Step-by-Step Guide to Adjusting a Tempering Valve
- Access the Valve:
Locate and gain access to the tempering valve. It’s typically found near the water heater or under sinks where hot and cold water lines meet. - Assess the Current Temperature:
Turn on the water and use a calibrated thermometer to check the current temperature of the water at the nearest outlet. This will give you a baseline to understand how much adjustment is needed. - Adjust the Temperature Control:
Most tempering valves have a temperature control mechanism, often a knob or a screw, that can be adjusted with a wrench or screwdriver. Refer to the manufacturer’s manual for specific instructions on adjustments. Typically, turning the control clockwise will reduce the temperature, while turning it counterclockwise will increase it. - Test and Calibrate:
After making an adjustment, allow the water to run for a few minutes to stabilize at the new setting. Re-test the water temperature with your thermometer. You may need to repeat adjustments several times to achieve the desired temperature. - Check for Leaks:
Once the desired temperature is achieved, inspect the valve and connecting pipes for any leaks. If leaks are present, tighten connections with a wrench and check seals for any damage that might require replacement. - Lock the Setting:
If your valve has a locking feature, secure the setting according to the manual. This prevents unintentional adjustments that could occur from bumps or vibrations. - Document the Settings:
Keep a record of the final settings and any changes made during the process for future reference. This information can be invaluable for maintenance or if further adjustments are needed.
Troubleshooting Common Issues
- Inconsistent Temperatures:
If the water temperature fluctuates, check if the valve is correctly installed and that the hot and cold feeds are connected properly. Also, ensure that there are no cross-connections in the plumbing system. - Valve Does Not Adjust:
Over time, mineral buildup can cause the internal mechanism of the valve to stick. If the valve does not adjust, it may need to be cleaned or replaced. - No Hot Water:
If adjusting the valve results in no hot water, check the settings again and ensure that the hot water supply is functioning correctly. It may also be indicative of a more significant issue with the water heater.
Maintaining Your Tempering Valve
Regular maintenance is crucial to ensure the longevity and proper function of your tempering valve. Schedule periodic inspections and cleaning to remove mineral deposits and debris. Replace any worn or damaged parts promptly to avoid malfunctions.
Conclusion
Adjusting a tempering valve is a critical skill for maintaining the safety and comfort of your home or building’s water system. By following these detailed steps, you can ensure that your water temperature is safe and consistent, preventing scalding and optimizing your system’s performance. Remember, if you’re ever in doubt during the adjustment process, consult with a professional plumber to avoid any mishaps or damage to your plumbing system.
